将 Quickstart 部署到 DevNet
将 Quickstart 应用从 LocalNet 部署到 DevNet,含验证者申请、VPN 配置与端到端工作流验证。
部署 Quickstart 到 DevNet
部署 Quickstart 到 DevNet
概览
In this guide, you’ll deploy the Quickstart app from LocalNet to DevNet. You’ll deploy the original DAR, deploy to the backend, frontend and test the workflow.
You should have the Quickstart application
installed and understand the
quickstart-project-structure-guide.
DevNet 验证者前置条件
You must have successfully submitted a validator request to successfully complete this guide.
在此提交申请: https://canton.foundation/apply-to-set-up-a-validator-node/
Visit the global synchronizer docs to learn more about the validator onboarding process and how to deploy a validator with Docker Compose.
You can find up-to-date Canton Foundation DevNet Super Validator Node Information at: https://canton.foundation/sv-network-status/
架构概览
Quickstart DevNet 部署分两部分:
- splice-node: Provides the validator infrastructure (participant, validator, wallet-ui, ans-ui)
- cn-quickstart: Provides the application layer (keycloak, pqs, backend-service, frontend)
   ┌────────────────────────────────────────────────────────────────┐
   │                         splice-node                            │
   │  ┌─────────────┐  ┌─────────────┐  ┌──────────┐  ┌──────────┐  │
   │  │ Participant │  │  Validator  │  │ Wallet-UI│  │  ANS-UI  │  │
   │  │   :8080     │  │   :5012     │  │  :3000   │  │  :3000   │  │
   │  └─────────────┘  └─────────────┘  └──────────┘  └──────────┘  │
   └────────────────────────────────────────────────────────────────┘
            │                  │
            │ Ledger API       │ Registry API
            ▼                  ▼
   ┌────────────────────────────────────────────────────────────────┐
   │                         cn-quickstart                          │
   │  ┌──────────┐  ┌──────────┐  ┌─────────────┐  ┌─────────────┐  │
   │  │ Keycloak │  │   PQS    │  │  Backend    │  │  Frontend   │  │
   │  │  :8082   │  │ (scribe) │  │   :8089     │  │   :5173     │  │
   │  └──────────┘  └──────────┘  └─────────────┘  └─────────────┘  │
   └────────────────────────────────────────────────────────────────┘
splice-node ports are internal container ports and routed via nginx by
hostname. cn-quickstart ports are directly exposed.
The frontend communicates with the backend via HTTP REST calls to
/api/* endpoints. The Vite development server proxies these requests
to the backend, which translates them into Ledger API calls. For a
detailed explanation of this fully mediated architecture, see
quickstart-project-structure-guide.
Quickstart 的 DevNet 配置
Quickstart environment variables are set for LocalNet usage by
default, but ledger connections differ between LocalNet and DevNet
configurations. For example:
| 变量 | LocalNet 值 | DevNet 值 |
|---|---|---|
LEDGER_HOST | localhost | grpc-ledger-api.localhost |
LEDGER_PORT | 5001 | 80 或 8080 |
配置 Host 条目
nginx.conf uses virtual hosting to route requests to backend services.
As a result, nginx inspects your Host HTTP header to determine backend
routing. Add explicit host entires for reliable routing.
在 /etc/hosts 添加:
   sudo vim /etc/hosts

   127.0.0.1 json-ledger-api.localhost
   127.0.0.1 grpc-ledger-api.localhost
   127.0.0.1 validator.localhost
   127.0.0.1 app-provider.localhost
   127.0.0.1 participant.localhost
   127.0.0.1 wallet.localhost
   127.0.0.1 ans.localhost
   127.0.0.1 keycloak.localhost
   127.0.0.1 host.docker.internal
此步骤只需完成一次。
| 主机条目 | URL | 用途 |
|---|---|---|
json-ledger-api.localhost | http://json-ledger-api.localhost/ | JSON Ledger API(REST 命令、DAR 上传) |
grpc-ledger-api.localhost | http://grpc-ledger-api.localhost/ | gRPC Ledger API(后端 LEDGER_HOST) |
validator.localhost | http://validator.localhost/ | 验证者应用 API |
wallet.localhost | http://wallet.localhost/ | Canton 钱包 Web UI |
app-provider.localhost | http://app-provider.localhost:5173/ | Quickstart 前端 |
participant.localhost | http://participant.localhost/ | Participant 管理/指标 |
ans.localhost | http://ans.localhost/ | Canton 名称服务(ANS) |
keycloak.localhost | http://keycloak.localhost:8082/ | OAuth2/OIDC 提供方 |
DevNet 主机条目
The nginx proxy routes based on hostname. Default port is 80. MacOS
users may need to change the validator port from 80 to 8080 to avoid
vmnetd errors. See vmnetd-error in the Troubleshooting section.
下载 Splice 节点发行包
In DevNet, your Splice node validator runs locally and connects to the DevNet synchronizer.
Download and extract the Splice node bundle by following the Requirements
step in the Docker Compose Validator Deployment guide.
The extracted splice-node directory and cn-quickstart should be
siblings to one another:
.
└── Canton_Network_App_Dev
    ├── cn-quickstart
└── splice-node进入验证者 Docker Compose 目录
cd splice-node/docker-compose/validator连接 Canton Network 验证者节点
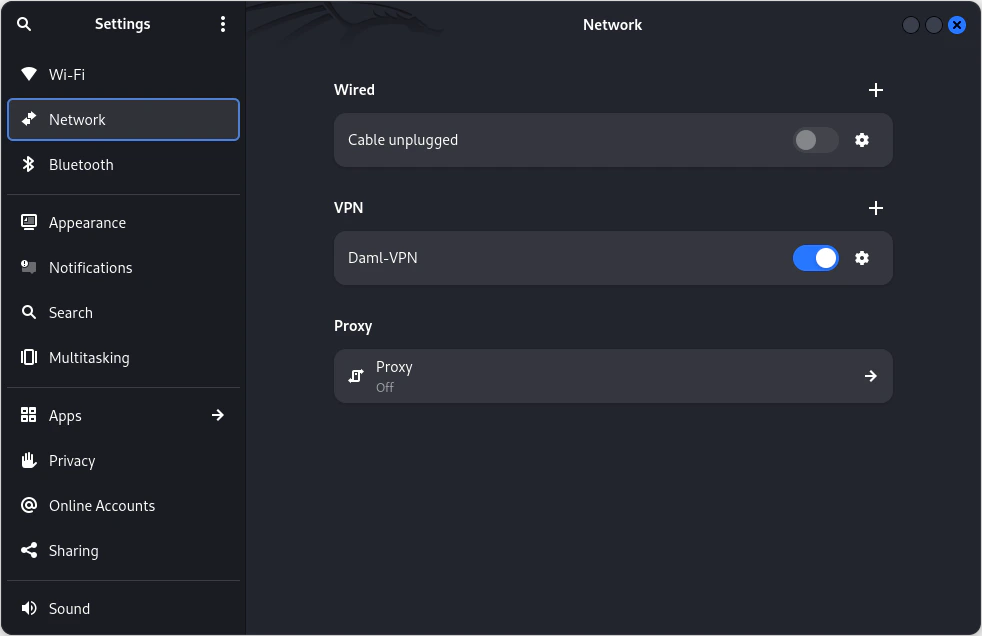
Navigate to your OS’s VPN settings, then connect to your sponsoring validator node.
VPN access is required for DevNet. Contact your sponsoring SV for VPN
credentials.
macOS
设置 > VPN

启用 Canton Network VPN

Linux
网络 > VPN
清理 Docker
Clear Docker If this is not your first time connecting to DevNet so
that stale containers do not interfere.
docker compose down -v
获取网络信息
获取 DevNet migration ID 与 Splice 版本
在终端于 /validator 目录运行:
   INFO_URL="https://docs.dev.global.canton.network.sync.global/info"
   SPLICE_VERSION=$(curl -s "$INFO_URL" | jq -r '.synchronizer?.active?.version')
   MIGRATION_ID=$(curl -s "$INFO_URL" | jq -r '.synchronizer?.active?.migration_id')

   echo "Splice Version: $SPLICE_VERSION"
   echo "Migration ID: $MIGRATION_ID"
Verify that the Splice version matches the splice-node version that you
recently downloaded and unzipped. Minor Splice versions change on a
regular basis. You may elect to hard code SPLICE_VERSION rather than
saving the most recent version, e.g. SPLICE_VERSION=0.6.4
获取 onboarding secret
You may use the following Super Validator URL if you are connected to
the Canton Network Global Synchronizer. If not, your sponsoring SV will
provide the appropriate URL. In this case, you must replace the provided
SPONSOR_SV_URL with your provided URL.
   # GSF Sponsor SV URL for DevNet
   SPONSOR_SV_URL="https://sv.sv-1.dev.global.canton.network.sync.global"

   # Request and store the onboarding secret
   ONBOARDING_SECRET=$(curl -s -X POST "$SPONSOR_SV_URL/api/sv/v0/devnet/onboard/validator/prepare")
   echo $ONBOARDING_SECRET
The onboarding secret is only good for 1 hour. If containers ever show unhealthy, try requesting a new onboarding secret as your first step in troubleshooting.
Party Hint
Set a Party Hint. The party hint must match the expected hint that is
established when running make setup from cn-quickstart/quickstart.
If you don’t remember your party hint, you can open a terminal and
navigate to cn-quickstart/quickstart/, then run make setup.
默认 party hint 为 quickstart-USERNAME-1
回到 validator 目录终端,设置 PARTY_HINT。
PARTY_HINT="quickstart-USERNAME-1"
该值须与预期 party hint 一致。
认证
If you would like to connect to DevNet without authentication, you may
skip this section and initiate the start.sh script without the -a
flag.
Update authentication variables in
splice-node/docker-compose/validator/.env using Quickstart’s
pre-configured Keycloak values. The following Authentication values can
be found in cn-quickstart’s keycloak env, realm and user JSON files.
Files include
quickstart/quickstart/docker/modules/keycloak/compose.env,
AppProvider-realm.json, and AppProvider-users-0.json.
splice-node/docker-compose/validator/.env
   # 认证

   # OIDC Provider URLs
   AUTH_URL="http://keycloak.localhost:8082"
   AUTH_JWKS_URL="http://host.docker.internal:8082/realms/AppProvider/protocol/openid-connect/certs"
   AUTH_WELLKNOWN_URL="http://host.docker.internal:8082/realms/AppProvider/.well-known/openid-configuration"

   # Audiences
   LEDGER_API_AUTH_AUDIENCE="https://canton.network.global"
   LEDGER_API_AUTH_SCOPE=""       # Optional, leave empty
   VALIDATOR_AUTH_AUDIENCE="https://canton.network.global"

   # Validator client credentials
   VALIDATOR_AUTH_CLIENT_ID="app-provider-validator"
   VALIDATOR_AUTH_CLIENT_SECRET="AL8648b9SfdTFImq7FV56Vd0KHifHBuC"

   # 管理用户
   LEDGER_API_ADMIN_USER="service-account-app-provider-validator"
   WALLET_ADMIN_USER="app-provider"

   # UI Clients
   WALLET_UI_CLIENT_ID="app-provider-wallet"
   ANS_UI_CLIENT_ID="app-provider-ans"
此为开发密钥,生产环境须更换。
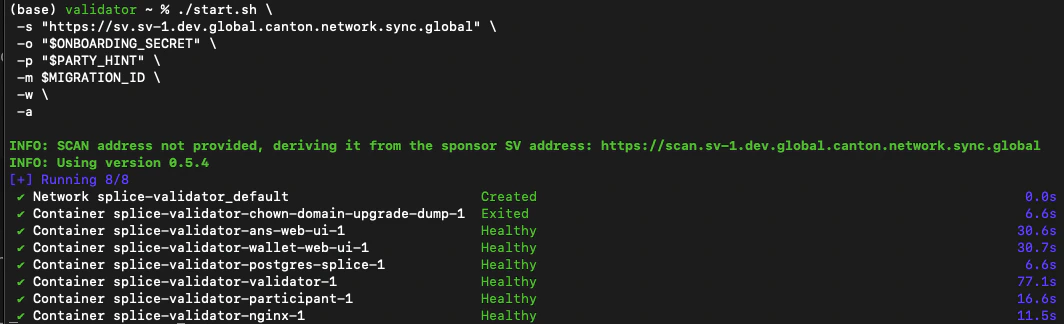
用 start.sh 启动验证者
Verify that you are in the validator directory, then run this command
to connect to DevNet:
   ./start.sh \
    -s "https://sv.sv-1.dev.global.canton.network.sync.global" \
    -o "$ONBOARDING_SECRET" \
    -p "$PARTY_HINT" \
    -m $MIGRATION_ID \
    -w \
    -a
参数说明
| 参数 | 说明 |
|---|---|
-s | 赞助 SV URL |
-o | Onboarding secret |
-p | 你的 party hint |
-m | Migration ID(非负整数) |
-w | 等待验证者完全就绪 |
-a | 启用认证 |
You can omit the -a flag to skip authentication setup. This may make
initial testing easier, but you should enable authentication for
production use.
While DevNet is starting, move on to the next step. (You’ll need to
complete the next step before DevNet is able to connect).
启动 Quickstart DevNet
In a second terminal, navigate to the Quickstart DevNet Docker Compose
directory.
   cd cn-quickstart/quickstart/docker/modules/devnet

   docker compose --env-file compose.env --profile devnet up -d postgres-keycloak keycloak nginx-keycloak postgres-pqs pqs-app-provider backend-service
   devnet ~ % docker compose --env-file compose.env --profile devnet up -d postgres-keycloak keycloak nginx-keycloak postgres-pqs pqs-app-provider backend-service
   [+] Running 7/7
    ✔ Container postgres-pqs          Healthy                  27.5s
    ✔ Container postgres-keycloak     Healthy                  6.2s
    ✔ Container keycloak              Healthy                  26.7s
    ✔ Container nginx-keycloak        Started                  26.7s
    ✔ Container splice-onboarding     Healthy                  41.3s
    ✔ Container pqs-app-provider      Started                  27.3s
    ✔ Container backend-service       Started                  41.4s
DevNet connects shortly after spinning up the docker containers. A
successful connection shows healthy containers.
若遇 vmnetd 错误见排障章节。
构建并上传 DAR
回到 /quickstart 目录。
cd ../../../
然后构建 Daml。
make build-daml
确认 DAR 已生成。
ls -la daml/licensing/.daml/dist/quickstart-licensing-0.0.1.dar
成功则返回 DAR 文件。
-rw-r--r-- 1 username staff 685582 Nov 25 09:00 daml/licensing/.daml/dist/quickstart-licensing-0.0.1.dar
向 DevNet 验证者上传 DAR
从 Keycloak 获取令牌以进行认证请求:
   TOKEN=$(curl -s -X POST "http://keycloak.localhost:8082/realms/AppProvider/protocol/openid-connect/token" \
     -d "grant_type=client_credentials" \
     -d "client_id=app-provider-validator" \
     -d "client_secret=AL8648b9SfdTFImq7FV56Vd0KHifHBuC" | jq -r .access_token)
(Note that the client_secret matches the app-provider-validator’s
secret in Keycloak’s AppProvider-realm.json).
From the /quickstart directory, upload the DAR to your DevNet
validator (MacOS users replace ${LEDGER_PORT} with 8080):
macOS
   curl -X POST "http://json-ledger-api.localhost:8080/v2/dars?vetAllPackages=true" \
     -H "Authorization: Bearer $TOKEN" \
     -H 'Content-Type: application/octet-stream' \
     --data-binary @daml/licensing/.daml/dist/quickstart-licensing-0.0.1.dar
Linux
   curl -X POST "http://json-ledger-api.localhost:${LEDGER_PORT}/v2/dars?vetAllPackages=true" \
     -H "Authorization: Bearer $TOKEN" \
     -H 'Content-Type: application/octet-stream' \
     --data-binary @daml/licensing/.daml/dist/quickstart-licensing-0.0.1.dar
空响应 {} 表示上传成功。
构建后端
在 /quickstart 构建后端:
make build-backend
为 DevNet 配置 Quickstart 前端
The frontend communicates with the backend via HTTP REST calls to
/api/* endpoints. The Vite development server proxies these requests
to the backend, which translates them into Ledger API calls to the
DevNet participant. Review vite.config.ts for details.
在 /quickstart 构建前端:
make build-frontend
启动 Vite 开发服务器。
make vite-dev
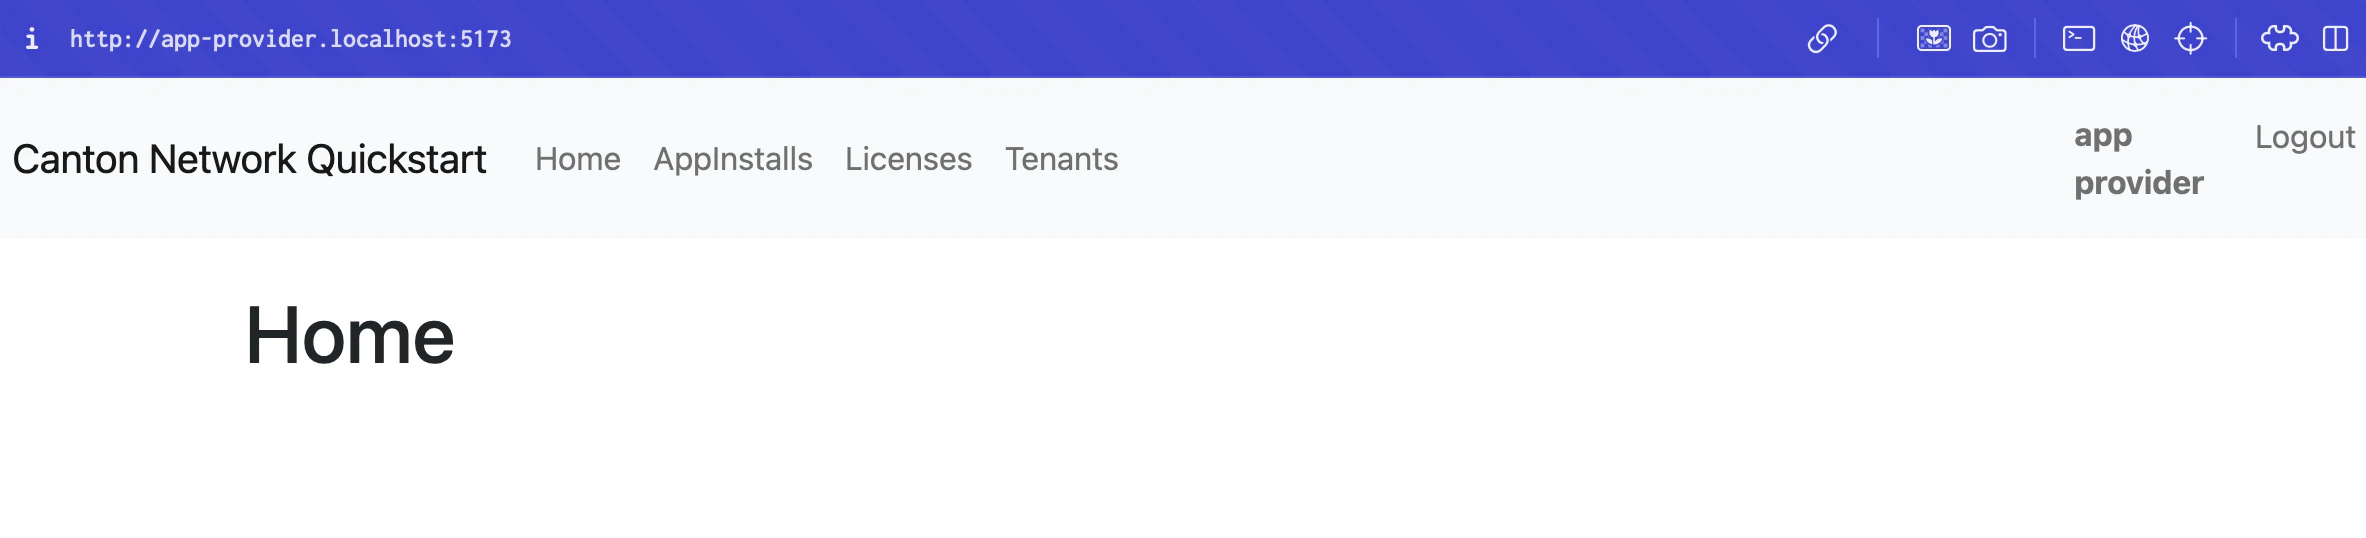
前端运行于端口 5173,浏览器打开:
http://app-provider.localhost:5173
It’s extremely important to prepend localhost with app-provider in
order to successfully log in through Keycloak.
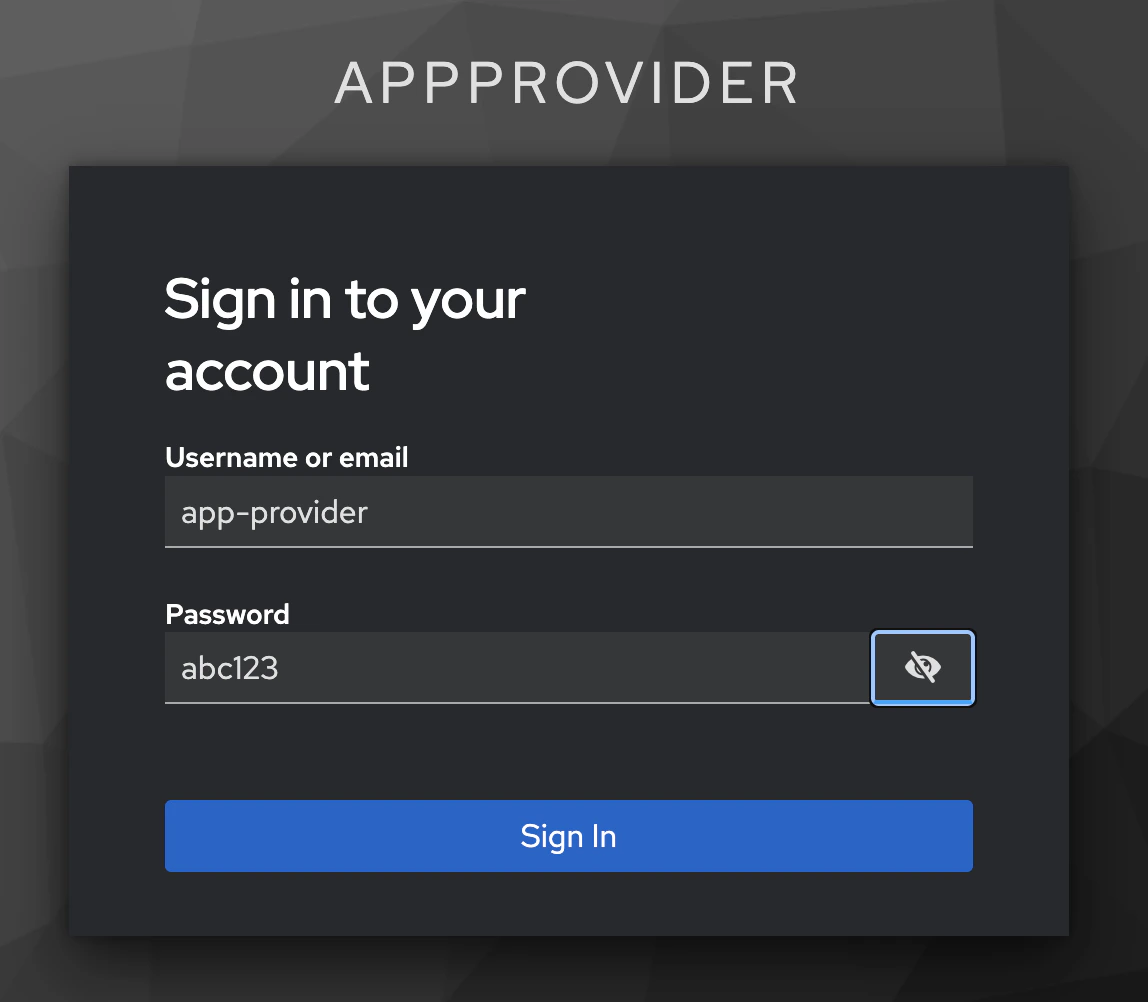
选择 AppProvider
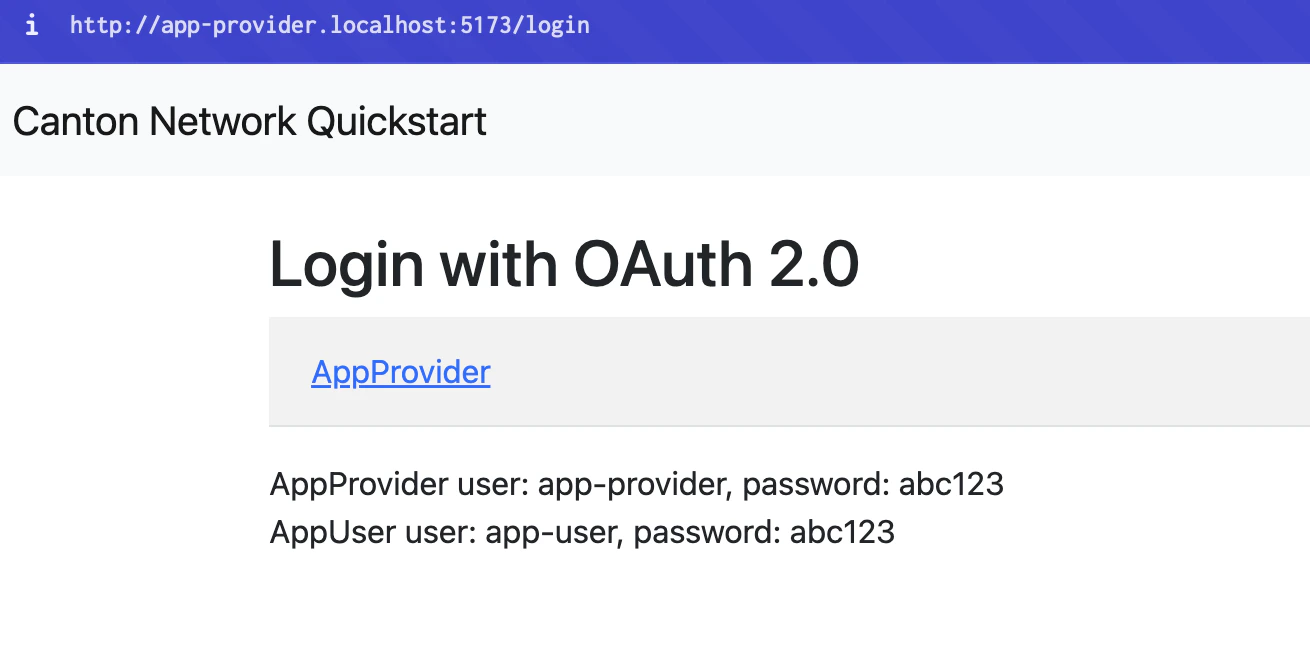
以 app-provider / 密码 abc123 登录
You sign in to the App Provider’s Quickstart homepage. Congratulations!
You’ve launched Quickstart to DevNet!
Quickstart won’t immediately operate as it does on LocalNet. You’ll
need to refactor to resolve connectivity issues. Perhaps begin with
make create-app-install-request.
附录
常用脚本
启停脚本
In the future, use the provided start.sh and stop.sh scripts to
quickly start and stop Quickstart DevNet Docker containers.
Use ./start.sh to run a live log stream in terminal. (exit with
ctrl+c) Opt for ./start.sh -d to spin up the containers without a log
stream.
Stop all of the Quickstart DevNet Docker containers with ./stop.sh.
You may also remove the volumes with ./stop.sh -v.
健康检查
You can check that Docker services are connected by checking
docker ps. To check a specific service use grep. e.g.
docker ps | grep backend-service.
docker ps --format "table {{.Names}}\t{{.Status}}"
用 curl 获取令牌后探测服务。
获取认证令牌:
   TOKEN=$(curl -s -X POST "http://keycloak.localhost:8082/realms/AppProvider/protocol/openid-connect/token" \
     -d "grant_type=client_credentials" \
     -d "client_id=app-provider-backend" \
     -d "client_secret=05dmL9DAUmDnIlfoZ5EQ7pKskWmhBlNz" | jq -r .access_token)
调用所选服务:
Backend health check: curl -H "Authorization: Bearer $TOKEN" http://localhost:8089/actuator/health
超级验证者连通性检查
You may make a connectivity check to the DevNet super validator at
anytime:
curl -s "https://scan.sv-1.dev.global.canton.network.sync.global/api/scan/v0/splice-instance-names"

查看表
可查询表列表探索容器 schema。
   docker exec -it splice-validator-postgres-splice-1 psql -U cnadmin -d validator -c "
     SELECT schemaname, tablename
     FROM pg_tables
     WHERE schemaname = 'validator'
     ORDER BY tablename;"
确认当前 migration ID
curl -s "https://docs.dev.global.canton.network.sync.global/info" | jq '.synchronizer?.active?.migration_id'
查找 DSO 指纹
curl -s "https://scan.sv-1.dev.global.canton.network.sync.global/api/scan/v0/dso-party-id"
Docker
查看 Docker 日志
docker logs FAILING_VALIDATOR --tail 100
强制结束容器
docker kill $(docker ps -q)
优雅停止
docker stop $(docker ps -q)
docker ps -q lists the container IDs of running containers $()
passes those IDs to the kill or stop command
停止后删除容器
docker rm $(docker ps -aq)
一条命令
docker stop $(docker ps -q) && docker rm $(docker ps -aq)
排障
解决 vmnetd 错误
若出现 vmnetd 错误,通常
straightforward solution is to update the validator compose port from 80 to 8080.

If necessary, to resolve “vmnetd running errors”, find nginx service
in splice-node/docker-compose/validator/compose.yaml. It is currently
at line 163. Change port 80:80 in "${HOST_BIND_IP:-127.0.0.1}:80:80"
to 8080:80.
splice-node/docker-compose/validator/compose.yaml
   nginx:
      image: "nginx:${NGINX_VERSION}"
      volumes:
        - ./nginx.conf:/etc/nginx/nginx.conf
        - ./nginx:/etc/nginx/includes
      ports:
        - "${HOST_BIND_IP:-127.0.0.1}:8080:80" # Change this line from 80:80 to 8080:80
      depends_on:
        - ans-web-ui
        - wallet-web-ui
        - validator
      restart: always
      networks:
        - ${DOCKER_NETWORK:-splice_validator}
      healthcheck:
        test: ["CMD", "service", "nginx", "status"]
        interval: 30s
        timeout: 10s
        retries: 3
        start_period: 60s
排查前端 JavaScript 映射错误
将 BACKEND_PORT 从 8080 改为 8089
Open cn-quickstart/quickstart/.env in a text editor and change
BACKEND_PORT=8080 to BACKEND_PORT=8089.
更新 vite 配置中的 proxyReq
Change line 35 in vite.config.ts from
proxyReq.setHeader('host', 'app-provider.localhost') to
proxyReq.setHeader('host', 'app-provider.localhost:5173').
ping app-provider.localhost
ping -c 1 app-provider.localhost
If successful, navigate to the app at http://app-provider.localhost:5173 and login.
检查 backend-service 日志
docker logs backend-service --tail 30
查找登录选项
curl -s http://localhost:8089/login-links | jq
获取后端 API 访问令牌
   TOKEN=$(curl -s -X POST "http://keycloak.localhost:8082/realms/AppProvider/protocol/openid-connect/token" \
     -d "grant_type=client_credentials" \
     -d "client_id=app-provider-backend" \
     -d "client_secret=05dmL9DAUmDnIlfoZ5EQ7pKskWmhBlNz" | jq -r .access_token)
验证令牌已获取
echo "Token length: ${#TOKEN}"
从 PQS 查询数据
查询 app install 请求
curl -H "Authorization: Bearer $TOKEN" http://localhost:8089/app-install-requests | head -10
查询许可数据
curl -H "Authorization: Bearer $TOKEN" http://localhost:5173/api/licenses
端口已被占用
If terminal shows Error: Port 5173 is already in use identify and kill
the associated node process, then run your command again.
lsof -i :5173
   COMMAND   PID     USER       FD   TYPE  DEVICE  SIZE/OFF  NODE  NAME
   node      12345   USERNAME   34u  IPv6  DEVICE  0t0       TCP   localhost:5173 (LISTEN)
kill -9 12345
重启不健康的 Docker 容器
If you have trouble connecting to healthy containers, restart the Docker containers and capture full logs.
停止容器
docker compose -f splice-node/docker-compose/validator/compose.yaml down
重新启动并捕获日志
docker compose -f splice-node/docker-compose/validator/compose.yaml up validator 2>&1 | tee validator-startup.log
在终端阅读日志:
docker logs splice-validator-validator-1 2>&1 | head -300
将容器名替换为实际名称。
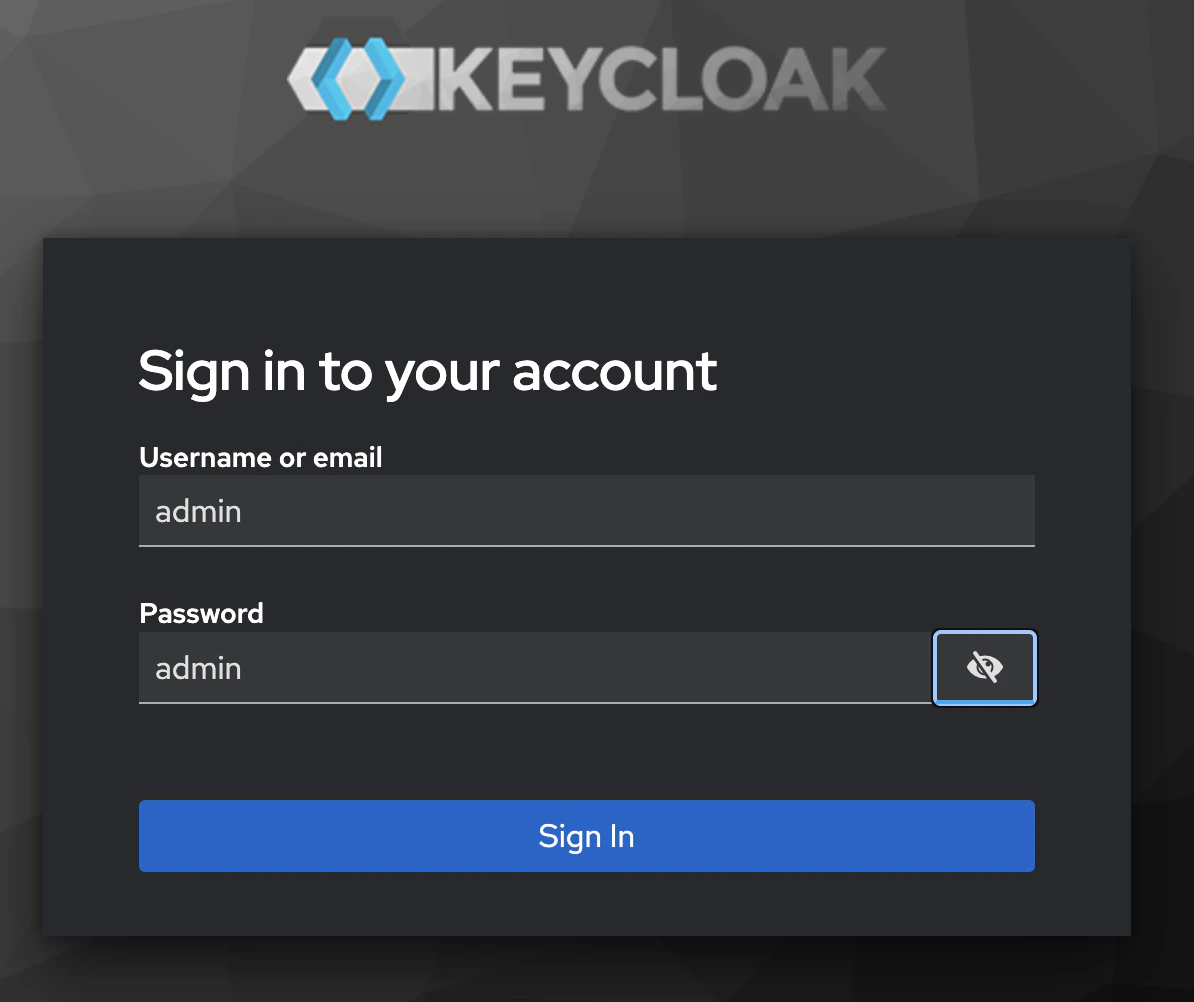
Keycloak
You can login to the Keycloak admin GUI at
http://host.docker.internal:8082/ Use admin for the username and
password.
查看 Keycloak 日志:
docker logs keycloak
查看 PostgreSQL:
docker logs postgres-keycloak
检查 OIDC discovery 端点:
curl -s http://keycloak.localhost:8082/realms/AppProvider/.well-known/openid-configuration | jq .
获取 OAuth2 AppProvider realm 令牌:
   curl -s -X POST http://keycloak.localhost:8082/realms/AppProvider/protocol/openid-connect/token \
    -H "Content-Type: application/x-www-form-urlencoded" \
    -d "grant_type=password" \
    -d "client_id=app-provider-unsafe" \
    -d "username=app-provider" \
    -d "password=app-provider" | jq .access_token
获取 OAuth2 AppUser realm 令牌:
   curl -s -X POST http://keycloak.localhost:8082/realms/AppUser/protocol/openid-connect/token \
    -H "Content-Type: application/x-www-form-urlencoded" \
    -d "grant_type=password" \
    -d "client_id=app-user-unsafe" \
    -d "username=app-user" \
    -d "password=app-user" | jq .access_token
检查 Keycloak 公钥位置:
curl -s http://keycloak.localhost:8082/realms/AppProvider/.well-known/openid-configuration | jq .issuer
Expected response is
"http://host.docker.internal:8082/realms/AppProvider"
无法以 admin 登录 Keycloak
docker logs keycloak 2>&1 | grep -i "ssl\|https\|require" | tail -20
The following command disables the SSL requirements for the master realm
and allows you to login as admin at localhost:8082.
   docker exec -it keycloak /opt/keycloak/bin/kcadm.sh config credentials \
     --server http://localhost:8082 --realm master --user admin --password admin

   docker exec -it keycloak /opt/keycloak/bin/kcadm.sh update realms/master \
     -s sslRequired=NONE
splice-onboarding 排障
查找特定 env 值:
docker exec splice-onboarding env | grep -E "PARTICIPANT|LEDGER"
重启 splice-onboarding 容器:
   cd cn-quickstart/quickstart/docker/modules/devnet
   docker compose --env-file compose.env -f compose.yaml --profile devnet down -v
   docker compose --env-file compose.env -f compose.yaml --profile devnet build --no-cache splice-onboarding
   docker compose --env-file compose.env -f compose.yaml --profile devnet up -d
查看日志:
docker logs -f splice-onboarding
查询 splice-onboarding 网络:
docker inspect splice-onboarding --format '{{json .NetworkSettings.Networks}}' | jq
检查 splice-validator-nginx 所在网络:
docker ps --format "{{.Names}}" | grep -E "nginx|validator|participant"
再检查该容器网络:
   docker inspect splice-validator-nginx-1 --format '{{json .NetworkSettings.Networks}}' 2>/dev/null | jq || \
   docker network inspect splice-validator_splice_validator --format '{{range .Containers}}{{.Name}} {{end}}'
检查 splice-onboarding 是否已初始化:
docker exec splice-onboarding cat /tmp/all-done && echo "SUCCESS"
splice-onboarding 连接问题
若 splice-onboarding 日志显示:
   (base) devnet ~ % docker logs -f splice-onboarding
   Start with mode --init
   Initializing DevNet onboarding...
   Waiting for external participant at grpc-ledger-api.localhost:8080...
   Waiting for participant... attempt 1/60
   Waiting for participant... attempt 2/60
   Waiting for participant... attempt 3/60
   Waiting for participant... attempt 4/60
   Waiting for participant... attempt 5/60
Then there is likely an error in LEDGER_HOST or LEDGER_PORT. Unset
the variables or quit and restart terminal.
本文由 CC Privacy Club 根据 Canton Network 官方文档(CC-BY-4.0)整理翻译,仅供学习;实现细节以官方最新版本为准。